In onslaught game mode you have generators

and control points

ultimate goal is to destroy enemy generator, but when game starts both are shielded, and cant be damaged

you need to capture all control points in special order to lower shield of enemy generator
capturing control point is 2 step process, first you need to destroy CP cube that floats in the air, it will make control point neutral, then you need to touch pad on the ground to start build your CP cube and own the node, at the start all control points are neutral so they dont have that cubes and you just need to touch the pad.
here is some long onslaught map layout in the middle of the game
as you can see all control points are already conquered, blue team have 4 CPs and red team only 1, these light blue rings around generators and CPs are shields. To lower enemy shield you need to "connect" your control point to it. Right now blue team dont need to defend generator and 3 shielded CPs, they should split to 2 groups and defend last unshielded CP and try to capture enemy one, they should not attack red generator yet, its shielded and you cant damage it, capture last CP and after that red generators shield will be lowered and you can put your hand on juicy generator
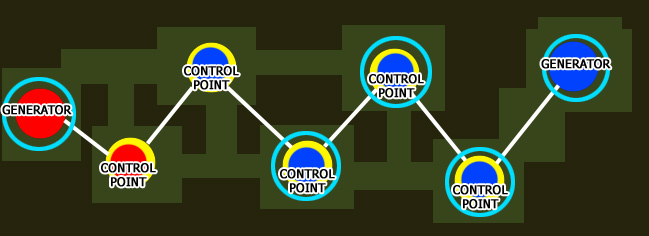
layouts can be more complicated than that, you can split path so its not always 2 points you need to defend/attack
I hope its enough info to understand this fine new game mode
2. How to make maps for onslaught
there are 3 new entitys for onslaught:
onslaught_generator
onslaught_controlpoint
onslaught_link
you need 2 generators and 1 control point minimum to make onslaught map
so lets make such map for a start
you already have some basic layout and want to and new entitys
create "onslaught_generator" entity at reds base
add key "team" "5"
it will make it belong to red team
add key "target" "redgenspawns"
now create few spawn points around using "info_player_team1"
add them key "targetname" redgenspawns"
now you should see line from spawns to generator
tip: select all spawnpoints together and then add that key to all of them ( hold shift and click them all)
now go to middle of the map where you planned control point and add "onslaught_controlpoint" entity
add key "target" "middlecpspawns"
add key "message" "Middle" its name of this control point
create few spawn points around using "info_player_deathmatch"
add them key "targetname" "middlecpspawns" in same way as you did near red generator
now lets connect our red generator to middle control point
create "onslaught_link" entity somewhere between red gen and middle cp
go to red generator and add key "targetname" "redgen"
go to middle CP and add key "targetname" "middlecp"
now go back to onslaught_link and add 2 keys:
"target" "redgen" and "target2" "middlecp"
you should see 2 lines coming out of link to red generator and middle cp
tip: you dont need to follow same order and jump back to generator to add "target" I used this so its more easy to understand
now lets finish this map, last part is blue generator
go to blue base and create "onslaught_generator" entity
add key "team" "14"
add key "target" "bluegenspawns"
add key "targetname" "bluegen"
add few spawn points around using "info_player_team2" entity
add them key "targetname" "bluegenspawns"
create "onslaught_link" entity somewhere between blue generator and middle cp
add keys "target" "bluegen" and "target2" "middlecp"
your done \o/ map should work now
here is example map: http://www.fileden.com/files/2008/9/30/ ... -micro.pk3
how to add turrets ?
for turrets near generators add them key "team" "5" for red team and "team" "14" for blue team and connect them to generator using "targetname" "redgenspawns" or "targetname" bluegenspawns"
for turrets near cp, just connect them to cp by adding key "targetname" "middlecpspawns"
3. How to prepare to mapping
UPDATE
it looks like that svn build have turrets broken here is quick fix: http://www.fileden.com/files/2008/9/30/ ... urrets.pk3 put it in: <nexuiz directory>/data/..
and before running map type "exec turrets.ctf" on console
you will need svn version of nexuiz to get this wroking, you can download it here http://emptyset.endoftheinternet.org/~r ... NEWEST.zip if you didnt do it already
and it would be best to use latest netradiant
for windows: http://emptyset.endoftheinternet.org/~r ... -win32.zip
for linux: you can compile from svn http://emptyset.endoftheinternet.org/sv ... t15/trunk/
if you want to use your old grumpy 1.5 radiant update entitys.dat from here: http://svn.icculus.org/*checkout*/nexui ... tities.def
on windows copy it to: ...\<radiant directory>\nexuiz.game\data
keep in mind to point your radiants to svn nexuiz instead of 2.4.2
sometimes it might happen that you dont have turrets entitys in radiant menu
to fix it copy this file: http://svn.icculus.org/*checkout*/nexui ... urrets.def
to ...\<radiant directory>\nexuiz.game\data